DIY Car Wrapping Guide
SECTION ONE: Preparing for Installation
Cleaning Supplies & Tools
- Degreaser or wax remover
- General paint-safe cleaner
- Isopropyl alcohol (IPA)
- Lint-free towel or lint-free paper towel
- Squeegee
Application Conditions:
Temperature:
The temperature significantly affects how well the vinyl adheres to the substrate. We advise working within a temperature range below 21°C.
Low temperatures increase the risk of tearing as the film becomes more brittle.
High temperatures activate the adhesive, leading to a more aggressive bond and making it harder to reposition the vinyl on the surface.
Environment:
It's best to apply the film indoors to maintain a consistent temperature and minimize dust and contaminants on the surface.
Vinyl Storage:
When storing vinyl, avoid exposing it to heat sources like radiators or direct sunlight. Keep humidity low and store the vinyl vertically.
Prior to applying any film to a surface, it's crucial to ensure proper preparation and cleaning under suitable conditions. Failure to do so could result in inadequate adhesion, leading to the appearance of bubbles and bumps on the surface.
Procedure:
The first step is to clean the surface using a paint-safe grease and wax remover to eliminate any dirt or grime. It's recommended to wash the car with car wash soap (avoiding cleaners with waxes) and then rinse the surface with water.
Thoroughly dry the surface using a clean lint-free towel or lint-free paper towel. Pay close attention to ridges, edges, and seams, as these areas are often overlooked and may harbor the most dirt and grime. To clean hard-to-reach edges, wrap a lint-free towel over a squeegee and swipe multiple times. Ensure each swipe is done with a clean portion of the towel until no dirt is visible on the swiped edge. Although time-consuming, this step is essential, especially for vehicle wrapping installations, as these edges are where the film ends are anchored and may peel off if not properly cleaned.
Surfaces with grease, oil, or wax significantly reduce film adhesion and may result in bubbles forming on neglected areas. To eliminate these contaminants, it's recommended to use a grease and wax cleaner. While alcohol-based cleaners like isopropyl alcohol can be used, they are less effective at removing wax compared to solvent-based cleaners. Alcohol is best suited for spot cleaning and quick wipe-downs.
Ensure the substrate is completely dry before applying the film. If needed, utilize a blow dryer or heat gun to expedite the drying process.
Apply the film promptly to minimize the accumulation of dust and contaminants on the surface over time.
Note: Certain surfaces may react unfavorably to different chemicals. It's essential to research which chemicals are suitable for use on the specific surface.
SECTION TWO: lnstallation
Application Supplies & Tools
- Squeegee with felt tip
- Heat gun
- Utility knife
- 3M 94 Tape Primer
- WrapCut Fine Filament Edge Cutting Tape
- Cotton gloves
- Masking tape
- Tape measure
- Infrared thermometer (optional)
Applying vinyl requires practice, skill, and above all, patience. For extensive projects such as vehicle wrap installations, it's advisable to have assistance from a second person.
Placement
Start by planning your approach. We suggest beginning with flatter areas as they are generally simpler and easier to manage.
Ensure there are no obstacles hindering your application, such as logos or hood ornaments. Research the best method for removing these objects from the car.
Using a tape measure, roughly measure the surface of the panel you're applying to, leaving extra material (at least 4-6 inches) on either side.
Cut the desired amount of film using a utility knife. Avoid unrolling or placing the film on the floor to prevent dust and debris from causing scratches during application.
With assistance, carefully remove the backing paper while applying tension to the film to minimize creases. Position the vinyl with the help of the other person, ensuring complete coverage of the panel without any exposed edges.
For moderately curved surfaces, reposition the vinyl to create tension over the entire area.
If you notice any creases or wrinkles after placement, gently apply heat using a heat gun to restore the vinyl to its original form.
Application Procedure
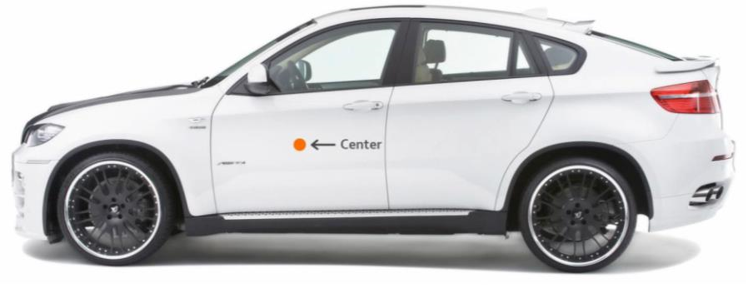
1. Begin by visually identifying the center of the panel. This will serve as your starting point.
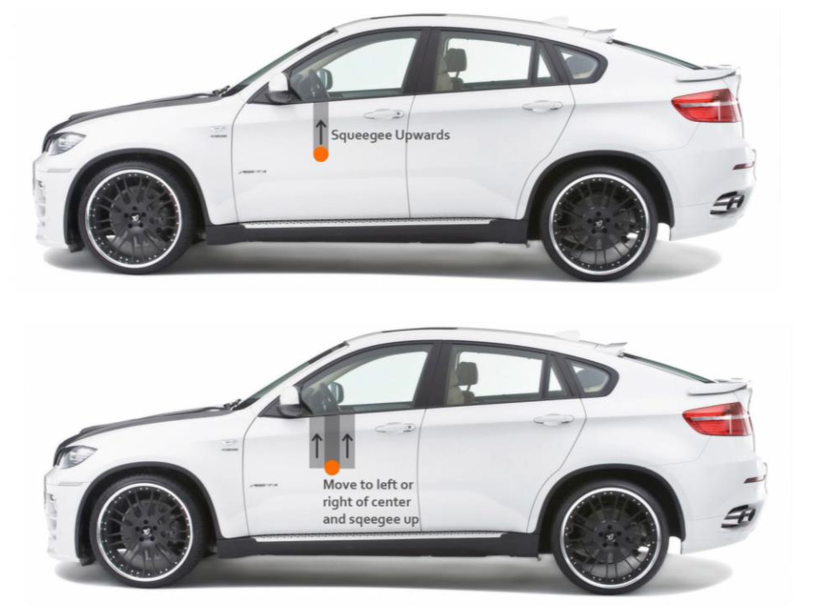
2. Starting from the center, work your way up. Then, move to the left or right of the center and repeat the process, working your way up and then down.
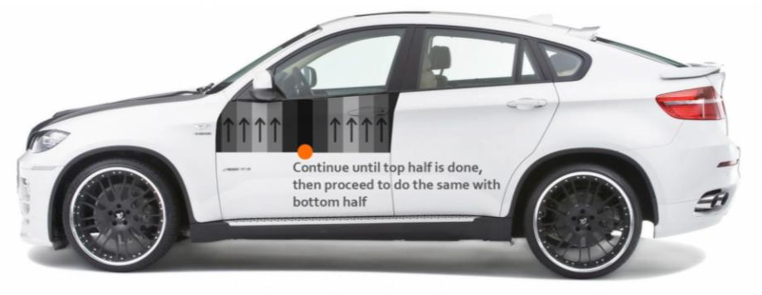
3. Continue this method as if you are dividing the panel into sections. After completing each section, move on to the next until you reach the edge.
4. For perfectly flat surfaces, avoid heating the film prior to installation, as this can make the process tedious and time-consuming. Simply lay the film over the surface and work in sections, starting from the center and moving outwards.
5. When using a squeegee, utilize the felt-tipped edge to reduce the risk of damaging textured or glossy films. Apply firm, even pressure while tilting the squeegee at an angle of approximately 45 degrees to the surface.
6. Work inch by inch with a firm, fluid motion, overlapping with previously applied areas to ensure even coverage.
7. Pay attention to detail and ensure that every area is covered. Even if an area appears untouched, it may still harbor air pockets, so every inch must be firmly pressed onto the surface.
8. While applying the film over the surface, always consider the most efficient route for air to travel beneath the vinyl to minimize the risk of bubbles or imperfections.
Heating
1. On curved surfaces, folds or creases may appear on the film. Reposition the film as tightly as possible and apply flash heat to areas not touching the surface to add extra tension.
2. Be cautious not to overheat the film, as this can cause loss of texture or luster, color change, or even holes in the film. Each film has different heat tolerance, so it's advisable to test before application.
3. While the film is still pliable, carefully apply tension and work through the area using a squeegee or gloves. Avoid working the film when it's too hot to prevent damage.
4. Folds or creases may develop into "crow's feet." To flatten them, gently cup each crease until they reduce in size or disappear. If necessary, lift the film to encompass the area with crow's feet and apply heat.
5. Carefully pull the film with both hands until it appears flat, while still applying tension, lay it over the surface.
6. Squeegee the remaining crow's feet. If they persist, repeat the process until they disappear.
7. For standard chrome films, consider applying another layer of laminate to prevent fading due to metal particles reacting with sunlight. However, Supercast chrome films come pre-laminated.
Finishing
Achieving a flawless finish during installation can give the surface the appearance of never having been vinyl wrapped. This seamless outcome demands experience, skill, and meticulous attention to detail. Failure to finish properly may result in exposed surfaces, inadequately sealed edges, and gradual peeling over time.
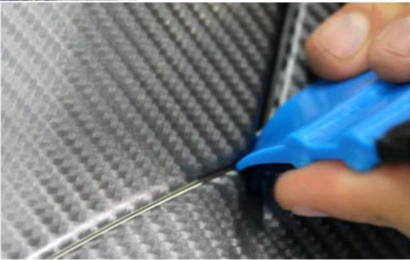
1. Edges:

Edges refer to the space between two panels on the surface, such as the gap between the front door and a fender on a car. To prepare this area, gently heat the space between the panels and run your finger down the gap while wearing cotton gloves. This helps cure the adhesive over the edges and conceals the surface beneath. Repeat this process over all seams on the surface.
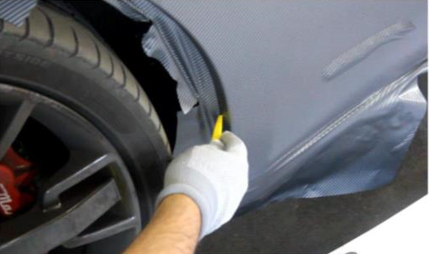
2. Wheels:

Special attention must be given to sealing the area around the wheels, as these areas are highly exposed to contaminants and abrasion.
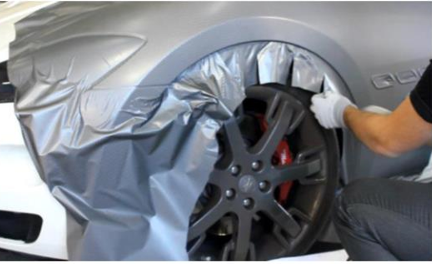
Heat the edge around the tire and run your finger along the circumference one inch at a time. Repeat this process multiple times until the edge is completely covered. If tension builds up, relieve it by cutting slits below the area. Ensure the final product extends all the way back to the edge above the tire.

Apply heat once more and add pressure to strengthen the adhesive bond with the edge.
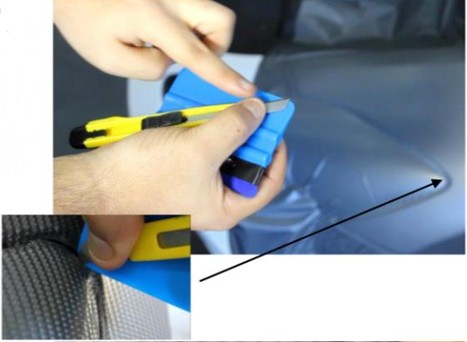
3. Cutting:
Cutting requires a sharp blade and steady hands to prevent tearing or damaging the vinyl. Start by running the blade along the inside edge at a 45-degree angle, ensuring it glides safely along the body panel.
Then, place the tip of the blade over the flat edge of a squeegee and run it along the gaps, exposing only 1-2 millimeters of the blade. This method provides a consistent slice and allows enough overlay to tuck the film between panels.
4. Corners:
For rounded or sharp edge corners, heat the vinyl until malleable and push it deep into the corner crevice. Use moderate heat to fuse the area, and avoid cutting when the film is still hot.
5. Post Heating:
XPO generation vinyls are primarily heat activated. Once the wrap is complete, set your heat gun to the highest setting and run it over the entire surface. Use a squeegee to remove any air trapped in neglected areas.
6. Edge Priming:
Edge priming involves applying adhesive primer to a surface before wrapping, but it's not a permanent solution. It's mainly used for tacking down a film or changing the surface energy of an edge. Post heating all primed areas ensures a lasting bond.
7. Edge Sealing:
Edge sealer is transparent liquid tape that strengthens the edges of the vinyl after application, especially in areas subject to chemicals, moisture, and contaminants. Use edge sealer in marine applications, near the fuel cap, wheel wells, etc.
SECTION THREE: Post-installation
Cleaning & Care
Aftercare Guidelines for Wrapped Surfaces:
1. Allow the surface to sit at room temperature for 24 hours after wrapping to ensure proper curing of the glue.
2. Avoid washing the car for 3-4 days to prevent contact with chemicals that may hinder the curing process.
3. When cleaning matte or textured films, avoid using soaps containing wax or protectants, as these can damage the finish.
4. Use pressure washers with caution, keeping the nozzle at least 24 inches away, pressure below 2000 psi, and water temperature below 80 degrees Celsius.
5. Avoid automatic car washes, especially brush types, as they can damage wrapped edges and dull the film's texture. Hand washing is recommended.
6. Lighter or white vinyls may be harder to clean. Use a vinyl-safe cleaner for difficult stains, but avoid rubbing too hard.
7. To remove tough contaminants like bird droppings or bug splatter, soak the affected areas in hot soapy water for several minutes, then rinse and dry.
8. Immediately wipe off fuel spills to prevent damage or discoloration to the surface.
9. Protect the wrapped surface from the sun's UV rays to prevent fading over time. Store the vehicle indoors or cover it with a protector to avoid exposure to rain, hail, or dew containing acidic pollutants.
10. Before using any chemical, ensure it is suitable for vinyl and follow the label instructions. Avoid applying anything you wouldn't use on paint. Chrome red vinyls are prone to discoloration, so laminating them is recommended to prevent this.
Following these guidelines will help maintain the appearance and longevity of your wrapped surface.
SECTION FOUR: Removal
Fortunately, removing vinyl is much quicker than installing it. Typically, the longer the vinyl remains on the surface, the stronger its bond becomes, making removal more challenging. This is because the adhesive has had more time to cure.
The most effective approach for vinyl removal is to work indoors in a warm environment, ideally at room temperature. Cold conditions can cause the vinyl to become brittle and prone to cracking when peeled. Using a heat gun, gently apply heat to a corner of the vinyl and slowly peel it off while continuing to apply heat generously. If you hear a crackling sound or the vinyl comes off in small increments, it indicates that the vinyl isn't heated enough for easy removal.
In cases where a vehicle has sustained damage while wrapped with vinyl or had questionable paint prior to wrapping, there may be challenges during removal. Although rare, there have been instances where poorly repainted surfaces or damaged areas have resulted in the vinyl removing paint along with it. Removing the film under such circumstances requires more effort and patience.
To address this, gently run a blade down the film with light pressure, ensuring it doesn't penetrate the film, and work on creasing out the vinyl in smaller sections. Apply heat to the vinyl and gradually peel the film away.
Another concern during removal is the presence of glue residue. When adhesive promoters and primers are used, they may leave behind adhesive residue upon film removal. While this residue does not harm the painted surface or compromise its quality, it can be a minor inconvenience. It can be easily rubbed off with your finger or removed using a paint-safe adhesive removing solvent.